How to mikrotik Lite SXT 5 Station Bridge?

Fadıl

1-First step:

In this article, we will make an example of a point-to-point (P2P) connection. We will use SXT-G-5HPnD.
We will display the SXT-G-5HPnD wireless configuration with pictures.

Firstly we are making configurations in WLAN 1 in the wireless tab. If we want to write the wireless settings as script code

/interface wireless
set [ find default-name=wlan1 ] ampdu-priorities=0,1,3 band=5ghz-a/n disabled=no frequency=5445 \ 
frequency-mode=superchannel guard-interval=long mode=station-bridge \
nv2-preshared-key=****** nv2-security=enabled radio-name="test" scan-list=4900-6100 \
ssid=Test_Sektor interface wireless security-profiles
set [ find default=yes ] authentication-types=wpa-psk,wpa2-psk eap-methods="" mode=dynamic-keys \
supplicant-identity=MikroTik wpa-pre-shared-key=password  wpa2-pre-shared-key=password
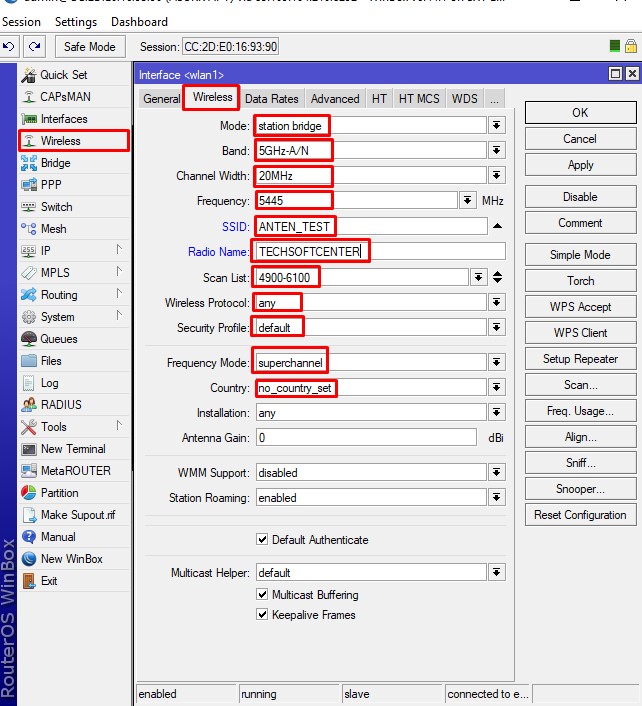

Mikrotik Wirelles

Java:Building a Sample Web App with STRUTS

Java:Building a Sample Web App with STRUTS

Fadıl

In this article, I will discuss building a sample web application using STRUTS. STRUTS is a leading open-source Web Application Framework. NetBeans is the leading open-source IDE and we will use it to demonstrate how to simplify application development using the IDE. Finally our application will run on TomCat application server.

Prerequisites:
We will assume that as a reader you are familiar with web application development, specifically using JSP and Java.
Preparation:
We need to install NetBeans IDE (and JDK needed for the IDE). You can install NetBeans from www.netbeans.org. Or click here for simple instructions on how to install the IDE.
Quick overview:
We will create a very simple web application just to demonstrate screen flow and action handling using STRUTS. We will use NetBeans to create the JSP aNDjava files, use tools such as auto generation of getters and setters and finally use the IDE to compile and test the app. NetBeans comes with integrated TomCat.

MIKROTIK: SETUP SQUIDBLACKLIST FIREWALL

MIKROTIK: SETUP SQUIDBLACKLIST FIREWALL

Fadıl

The blacklists were incredibly simple to implement into RouterOS and once configured, the lists can be scheduled to update at regular intervals via the RouterOS system scheduler. Squidblacklist.org provides a list of available blacklists, but make sure to review the blacklist compatibility chart first, before implementing the list into your RouterOS configuration. In addition, you will need to change the “dst-path” value to an existing path for the script to work. If you want to download the blacklist to the root of your MikroTik you can delete the “dst-path” property and its value entirely . Also, make sure that the “in-interface” and “out-interface” property value is set to that of your network environments WAN interface. Should you choose the “All-In-One Firewall/Filter Setup” script (via copy/paste in the MikroTik terminal), you will need to enable the scheduled tasks, since they are disabled by default in the script.

PHP Function:  Built-in Functions part 12

PHP Function: Built-in Functions part 12

Fadıl

The last of the Built-in Functions!
String Functions
The functions I will add here only scratch the surface of PHP’s built-in string manipulation functions, but if you understand thses common functions, your programming life will be a lil easier.

addslashes() and stripslashes()
The addslashes() and stripslashes() functions are very important when inserting and retieving data from a database. Often, text inserted into a database will contain special characters such as, single quotes, double quotes, backslashes, NULL, etc. that must be escaped before being inserted. The addslashes() function does just that using this syntax:

Queues Configuration Details

Fadıl

1. Simple Queue(Statik Queues)

  • Name: User A
  • Target: 172.16.1.10
  • Bandwidth: 1M Upload and 1M Download
  • Name: User B
  • Target:172.16.1.11
  • Bandwidth:700k Upload and 700k Download

2. Priority and Queue Order

By Default, all queues work by their order list(executes by serial or order number), as priority is 8 by default for each simple queues. If we change the priority less then 8 its will get more priority means if any queue has a priority of 7 Mikrotik queues will ensure his bandwidth first whatever his order. Priority 1 is MAX and it continues to 8.